NextCloud is a Dropbox-like solution for self-hosted file sharing and syncing. Installing NextCloud 12 on Ubuntu is trivial. Whether you want to backup, have file-syncing or just have a Google Calendar alternative, this guide is for you.
Newer version!
There is a newer version of the software and a newer version of this guide available:
What is NextCloud? Is it like a “cloud”?
If you stumbled here by chance and don’t know what NextCloud is, here is an article explaining its principal features and advantages/disadvantages. In this other article you can find NextCloud 12 new features. To tell you the truth, NextCloud is a SaaS cloud, if you want to know more about cloud types you can read this article.
In this article we will cover the installation of the server (not the client).
Step1: Install software
Important
I take absolutely NO responsibility of what you do with your machine; use this tutorial as a guide and remember you can possibly cause data loss if you touch things carelessly.
The first step in order to install NextCloud 12 is to install a web server and PHP. Although you can adapt this guide for many Ubuntu versions I suggest you to stick with Ubuntu 16.04 or higher since PHP7 is included. PHP7 brings many improvements over the past versions and will boost NextCloud too, as a matter of fact PHP7 is required since NextCloud 11. You will need root access during this procedure. The following procedure will install apache as webserver. Input the commands one by one to avoid errors!
Ubuntu 16.04Ubuntu 16.10Ubuntu 17.04Ubuntu 17.10
Open a terminal and input the following commands:
# apt-get install apache2 libapache2-mod-php7.0 bzip2
# apt-get install php7.0-gd php7.0-json php7.0-mysql php7.0-curl php7.0-mbstring
# apt-get install php7.0-intl php7.0-mcrypt php-imagick php7.0-xml php7.0-zip
Open a terminal and input the following commands:
# apt-get install apache2 libapache2-mod-php7.0 bzip2
# apt-get install php7.0-gd php7.0-json php7.0-mysql php7.0-curl php7.0-mbstring
# apt-get install php7.0-intl php7.0-mcrypt php-imagick php7.0-xml php7.0-zip
Open a terminal and input the following commands:
# apt-get install apache2 libapache2-mod-php7.0 bzip2
# apt-get install php7.0-gd php7.0-json php7.0-mysql php7.0-curl php7.0-mbstring
# apt-get install php7.0-intl php7.0-mcrypt php-imagick php7.0-xml php7.0-zip
Open a terminal and input the following commands:
# apt-get install apache2 libapache2-mod-php7.0 bzip2
# apt-get install php7.0-gd php7.0-json php7.0-mysql php7.0-curl php7.0-mbstring
# apt-get install php7.0-intl php7.0-mcrypt php-imagick php7.0-xml php7.0-zip
Step2: Database selection
Now that you have set up the environment, all that is left is to choose a database that will support the installation. You have three choices:
- SQLite: is a single-file database. It is suggested only for small installations since it will slow NextCloud down sensibly.
- MariaDB/MySQL: are popular open source databases especially amongst web developers. It is the suggested choice.
- PostgreSQL: a popular enterprise-class database. More complicated than MySQL/MariaDB.
Now, this choice won’t really alter the functionality of NextCloud (except if you use SQLite), so pick whatever you know best. If you’re unsure pick MariaDB/MySQL.
SQLiteMySQL/MariaDBPostgreSQL
Install the software:
# apt-get install sqlite3 php-sqlite3
Install the software:
# apt-get install mariadb-server php-mysql
Or if you prefer MySQL:
# apt-get install mysql-server php-mysql
During the installation you will be prompted to choose a root password, pick a strong one. If you’re not prompted to choose a password, the default one will be blank. (This is potentially insecure, change it!)
Now you need to enter the database (you will be asked the password you just set):
$ mysql -u root -p
Now that you are in create a database:
CREATE DATABASE nextcloud;
Now you need to create the user that will be used to connect to the database:
CREATE USER 'nc_user'@'localhost' IDENTIFIED BY 'YOUR_PASSWORD_HERE';
The last step is to grant the privileges to the new user:
GRANT ALL PRIVILEGES ON nextcloud.* TO 'nc_user'@'localhost';
FLUSH PRIVILEGES;
When you’re done type Ctrl-D to exit.
Install the software:
# apt-get install postgresql php-pgsql
Now you need to enter the database:
$ sudo -u postgres psql
Now that you are in create a database:
CREATE DATABASE nextcloud;
Now you need to create the user that will be used to connect to the database:
CREATE USER nc_user WITH PASSWORD 'YOUR_PASSWORD_HERE';
The last step is to grant the privileges to the new user:
GRANT ALL PRIVILEGES ON DATABASE nextcloud to nc_user;
When you’re done type \q and press enter to exit.
Step 3: Install NextCloud
The last step is to actually get the software, configure it and run it.
Ubuntu
With these step we download the software and extract it:
# cd /var/www
# wget https://download.nextcloud.com/server/releases/latest-12.tar.bz2 -O nextcloud-12-latest.tar.bz2
# tar -xvjf nextcloud-12-latest.tar.bz2
# chown -R www-data:www-data nextcloud
# rm nextcloud-12-latest.tar.bz2
Now we need to create a new file in /etc/apache2/sites-available/nextcloud.conf . Feel free to use whatever editor you feel comfortable with and add the following lines:
Alias /nextcloud "/var/www/nextcloud/"

<Directory /var/www/nextcloud/>
  Options +FollowSymlinks
  AllowOverride All

 <IfModule mod_dav.c>
  Dav off
 </IfModule>

 SetEnv HOME /var/www/nextcloud
 SetEnv HTTP_HOME /var/www/nextcloud

</Directory>
Once done it’s time to enable the new site and enable apache mods that are needed by NextCloud:
# a2ensite nextcloud
# a2enmod rewrite headers env dir mime
# systemctl restart apache2
Step 4: Configuring firewall
This step is essential when your firewall is enabled. If your firewall is enabled you won’t be able to access your NextCloud 12 instance; on the other hand if it isn’t enabled you shouldn’t have any problems and you can simply skip this step.
Tip!
Keep in mind having a firewall enabled is a good security practice and you should already have one enabled.
In order for the firewall to work, it must be enabled. This guide will not include this part. When you enable a firewall many things can go wrong, e.g. you’re using SSH, you enable the firewall and your connection is cut and can’t connect otherwise, hence you should carefully review the documentation from your distribution.
To open the ports needed by NextCloud 12 follow these steps:
UFWIPtables
UFW is the default firewall in Ubuntu, if you’re using one, you’re probably using UFW.
# ufw allow http
# ufw allow https
IPtables is an older firewall (still widely used), if you’re not using UFW you can use IPtables directly.
# iptables -A INPUT -p tcp -m tcp --dport 80 -j ACCEPT
# iptables -A INPUT -p tcp -m tcp --dport 443 -j ACCEPT
Step 5: Install
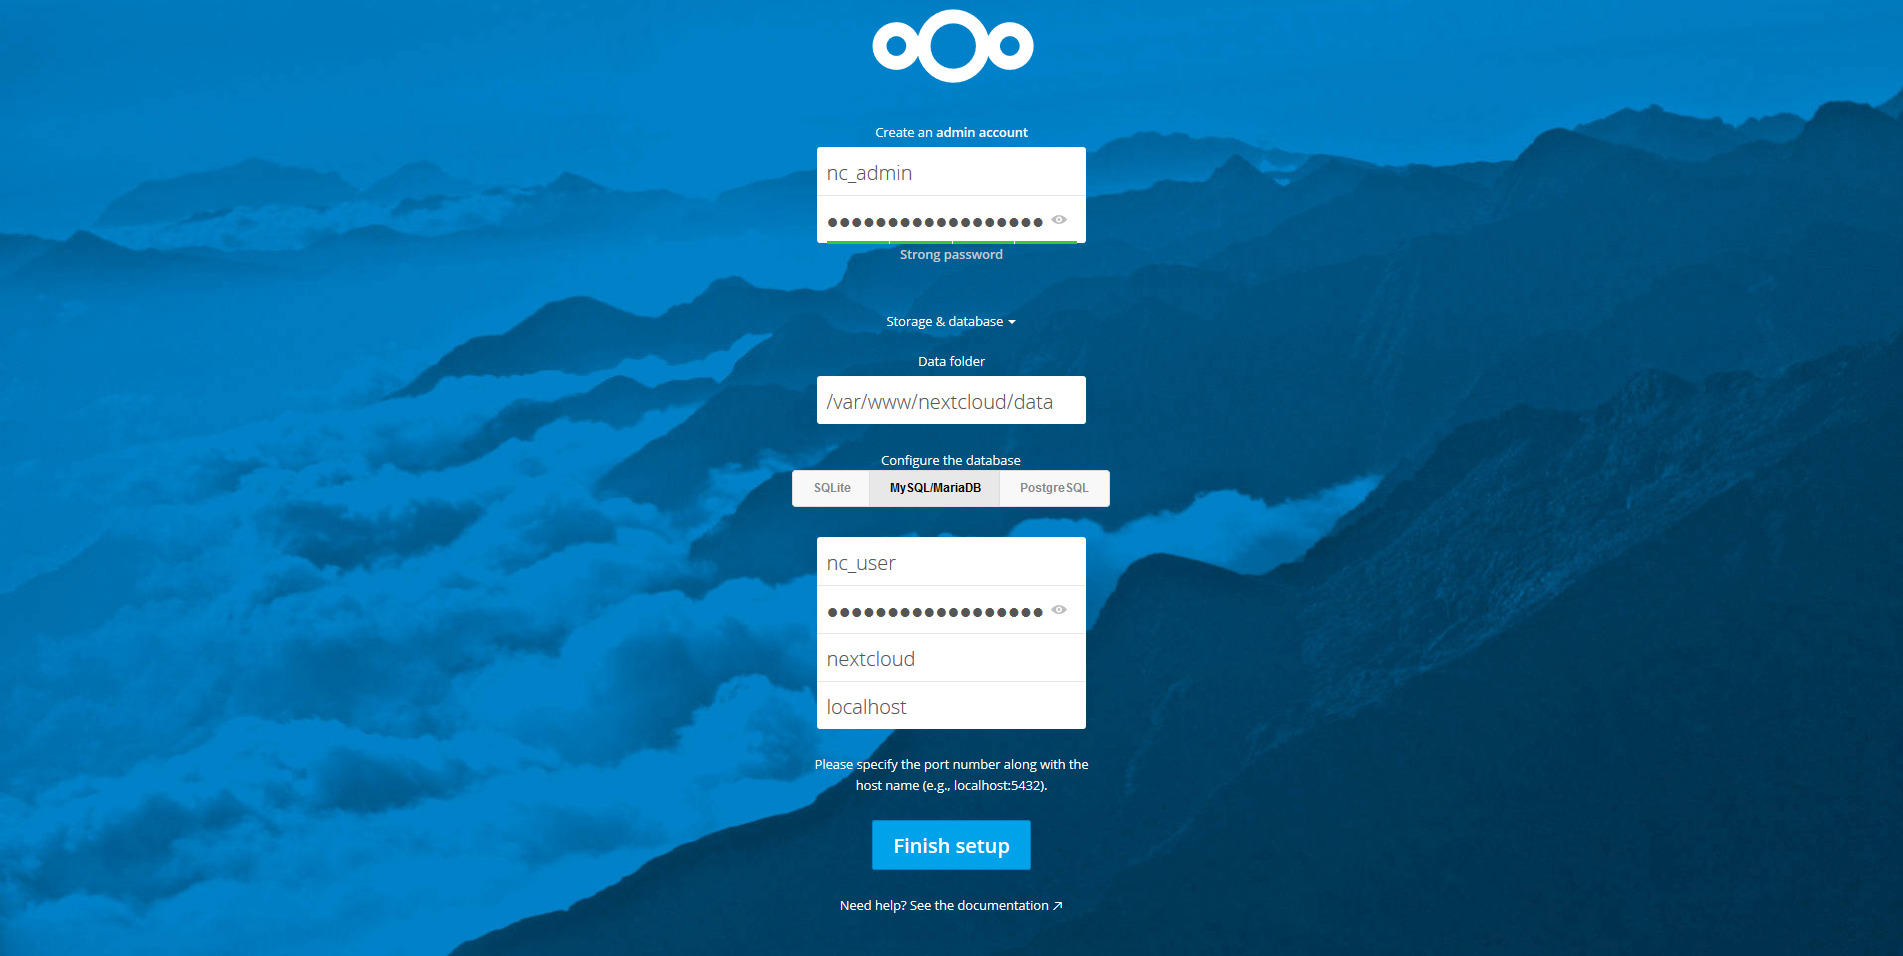
Once you’re done with selecting the database, it’s time to install everything. Head to http://YOUR_IP_ADDRESS/nextcloud/ and you will be facing the following screen:

Nextcloud 12 installation
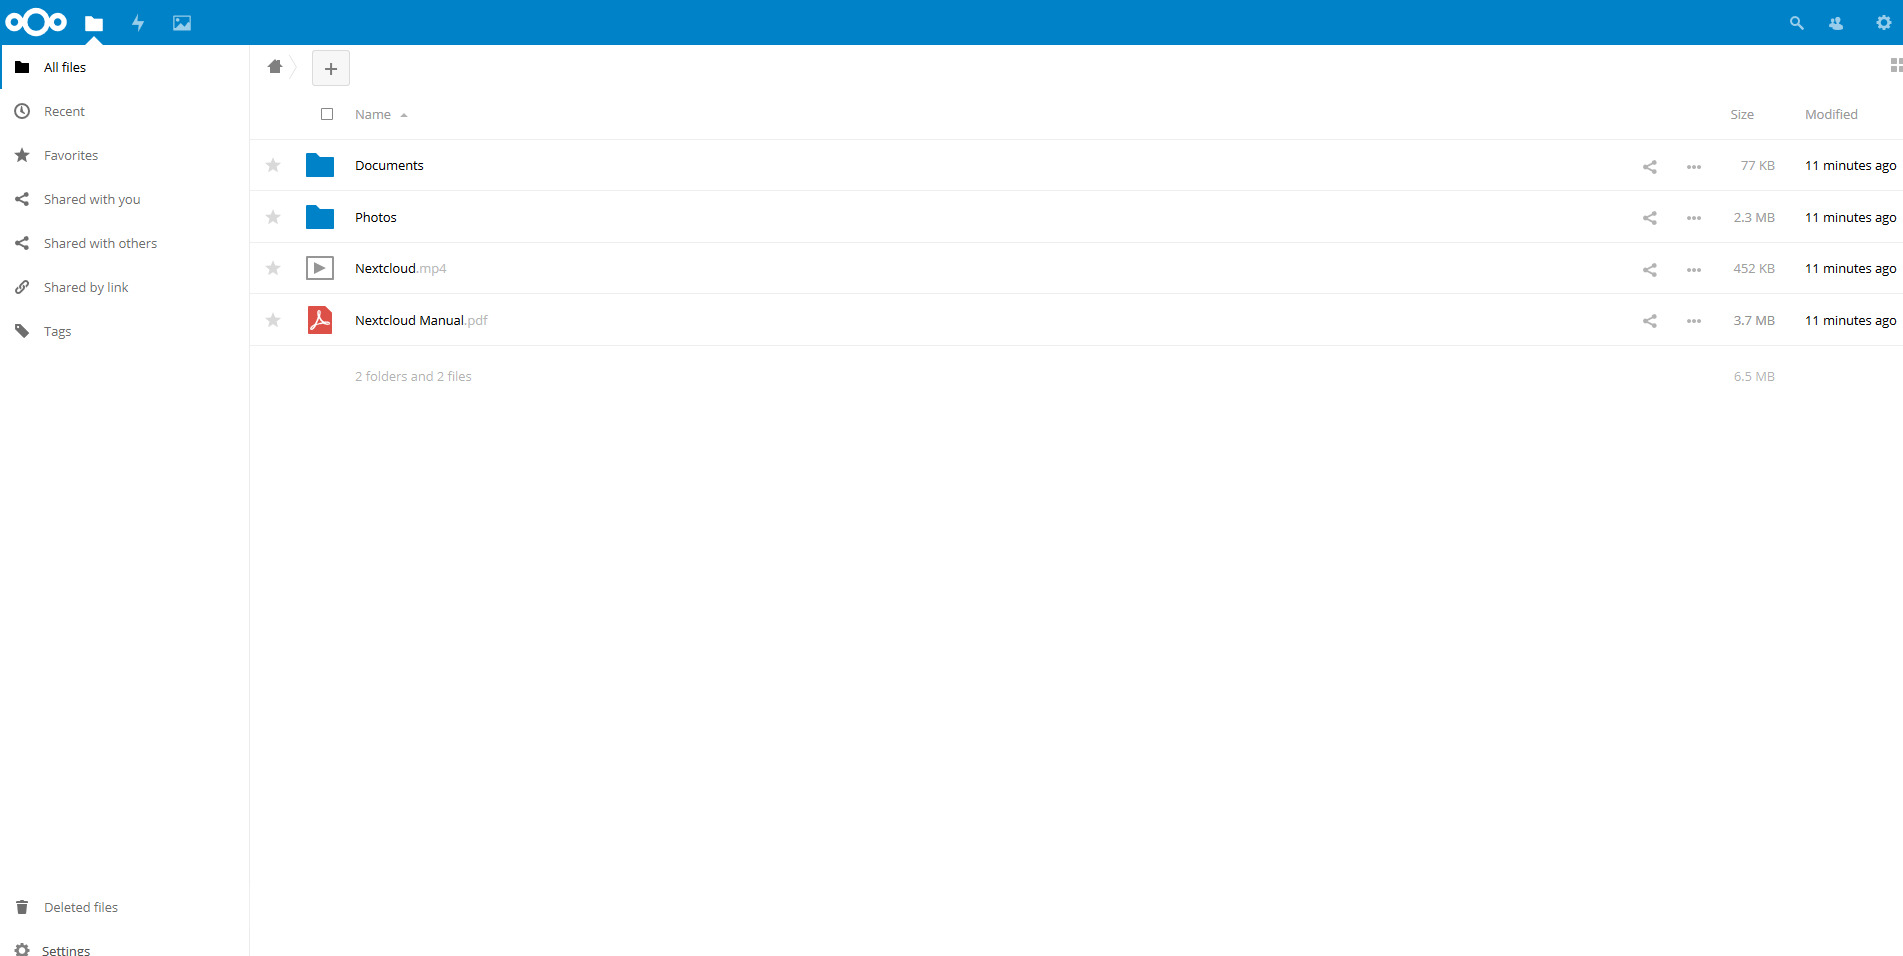
Select an administrator username and password, then you can select the data folder, but if you don’t know what you’re doing it’s best if you leave it with the default value. Then click on “Storage & Database” to select the database you chose during step 2. Fill everything and if you’ve followed all the steps correctly you should be seeing the Files app:

Nextcloud 12 Files App
The IT guy with a slight look of boredom in his eyes. Freelancer. Current interests: Kubernetes, Tensorflow, shiny new things.


I get permission denied on step 3 running wget. I am using Google Cloud Platform. I am not sure whether its folder permission or or what?
Hello Skeptic, thank you for choosing my guide to install NextCloud 12. Indeed it is a permission you’re lacking. Are you executing these commands as privileged user? (or as root?). You can become a privileged user by prefixing “sudo” to a command, or if you prefer to become root you can use “sudo su”. Let me know if it works or you need further help : )
Hey, my DB password is now blank. How do i change it? Thx for this tut!
Hello Puff Face, if you’re using the root user you can change the password using the mysql_secure_installation script. If you created another user and want to change his password you should refer to MariaDB/MySQL manual since the procedure changes depending on the version. If you want to take the “short route”, you can delete (DROP USER username;) and recreate the user, mind that you will lose the privileges associated with that user.
trying to run command: a2ensite nextcloud . and get error site nextcloud does not exist .
Hello Andreas,
before the a2ensite command there is a file that needs to be created. That file is located in /etc/apache2/sites-available/nextcloud.conf . Are you sure you created it properly? Please, verify that and let me know : )
no looks like i did something wrong there. it`s working now.
thanks for your help :)
ERROR: /etc/apache2/sites-enabled/nextcloud.conf is a dangling symlink!
ERROR: Site nextcloud does not exist!
i get this errors. im on ubuntu server. what can i do ? :P
Hello Andreas,
please read the other answer I gave you, you will be able to fix this too. The error you are getting indicates that the symlink points to an incorrect location.
thank for your help :) I Removed everything and started from the beginning.
this time it all worked fine :) again thx for your help
Sorry, everything went smoothly, but when I write http://192.168.1.7/nextcloud/ on the address bar it says “Not found”. I tried to forward port 80 on the router or stop the router firewall but it didn’t work. Could you please help? Thanks.
Hello Angelo, have you double checked that is the correct IP? If you have access to a browser on the host machine, can you confirm you’re able to browse the installation? Maybe I’m wrong, but I do suspect you’re trying to access your NextCloud instance from OUTSIDE your network, if that’s the case you should use your public IP address and not the private one. If you need further help please let me know :)
Thanks for your message. Actually I was trying from my host machine. I reinstalled nextcloud again, now I get something like php code (starting with <?php) on my browser. This means my php is not running properly? Any help would be appreciated. Thanks.
Hello Angelo, you could find this discussion useful: http://www.marksei.com/install-owncloud-10-server-centos/#comment-3574887835
Hi, it’s working now! Your suggestion helped a lot!
Running the command a2enmod php7.0 I received an error after restarting apache2. To fix it: sudo a2dismod mpm_event, then sudo a2enmod mpm_prefork, then sudo service apache2 restart. Next cloud up&running now.
I have a “standard” ubuntu 16.04, so I thought this would be useful for an average user like me.
Thanks
I suggest the data directory should be placed outside the www directory. That is safer, isn’t it?
Hello Guido,
sorry for the delayed reply. There usually isn’t an issue with leaving the datadir within the web root directory; as long as the server is configured correctly, the server works properly, there are no flaws in code.
The issue here is usually when the server is misconfigured and allows unrestricted access to the datadir. I do think it’s best to tweak the sever properly since a misconfiguration will expose you to risk even if you move the whole datadir.
Against flaws in the code (NextCloud or other software running on the same server) again, configuration and isolation practices are your friends, but as long as there is a need for the software to WRITE inside that directory, there will be a risk. This risk isn’t avoidable, but it can be mitigated by hardening practices and specific software (SELinux, AppArmor).
That said many will disagree with me, and will say that changing this path is a MUST. I didn’t include this step in all the tutorials I wrote about NextCloud/OwnCloud since most of these tutorials are basic setups. Also, don’t forget
moving the datadir outside of the web root directory isn’t officially supported and can lead to errors, although there is a parameter to explicitly change the datadir in config.php .
I could not execute http://ipaddress/nextcloud/
any solution ?
I tried to find my ip with ifconfig comand
Hello Farabi, unfortunately that can depend on may factors. I suggest you review the guide step by step verifying you completed each step correctly. Also the IP you’re trying to access must be in the same network segment (mostly your LAN) as the one trying to access it. This guide doesn’t cover exposing NextCloud to the Internet.